
- Think about the purpose of the page. What message do you want the reader to take away? What information do you want to convey to the reader?
- Create & gather the materials you’ll need for the page: Text, images, documents, etc.
- Name image files and document files in ways that will be easy to search, and easy to tell what they’re for. Include a date, and consider putting it at the beginning of the filename. Use only letters, numbers, periods, dashes, and underscores. Example: “2023.04.23.Example.Filename.For.Practice.jpg”
- Think about how you want the page to appear. The page should be easy to read and be visually attractive.
- Log into WSO’s WordPress instance at https://watercolorsocietyoforegon.com/wp-login.php .
- In the WordPress dashboard left column, click on Pages > Add New .
- Use the Block Editor, sometimes also called the Gutenberg Editor, whenever possible. Avoid using the Classic Editor unless you really need a feature it has which isn’t in the Block Editor.
- Add a concise title for the page.
- Set the “Permalink” URL for the page via the following:
- Decide which page in the website should be the “Parent” of your new page. Select the Parent Page in the right menu of the Block Editor — click on the “gear” button and then “Page” if this right menu isn’t visible. The Parent Page selection is under Page Attributes.
- Decide on the last part of the URL for your new page. This is called the “slug”. The slug should be very concise, and only contain letters, numbers, and dashes. The default slug is the page title, but you’ll often want a more concise slug. Set the slug by clicking on the URL in the right column.
- Lay out and edit your page using the Block Editor.
- Add links to any appropriate elements.
- Save drafts frequently, by clicking on “Save draft” in the upper right.
- Preview the page when desired by clicking on Preview > Preview in new tab in the upper right.
- When you’re ready to publish the page, click “Publish” in the upper right. Double-check everything, then click “Publish” again.
- Your page is now visible on the web!
How To Create a WSO Website Post *** Under Construction ***
Pages and Posts are different in WordPress, and thus are different on the WSO website:
- Pages generally have longer-term content and stay up for a longer time.
- Posts are very much like blog posts: Posts are time-based content. They attract attention to a specific topic for a short amount of time.
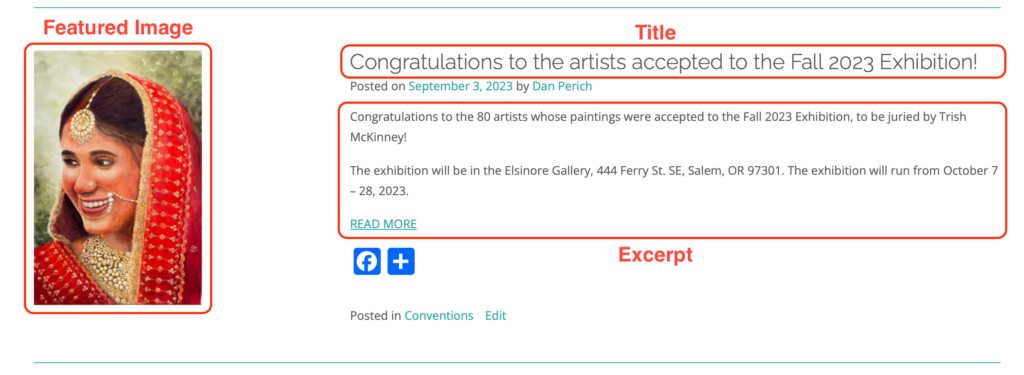
Each post has a small amount of content which appears on the homepage. This homepage content links to a page for deeper information.
The homepage content of the post includes:
- The Title of the post. This should be catchy, to attract attention.
- A Featured Image. A small version of the Featured Image appears on the homepage. A larger version appears at the top of the post’s associated page.
- An Excerpt: About a paragraph of text, summarizing the message of the post, and attracting the viewer to click for more information.
Manual Excerpts: You can specify the text which appears in the Excerpt, instead of having WordPress automatically generate it.
- In the Post editor, in the right column, with Post selected (rather than Block), find the box marked Excerpt.
- Type or paste the text you want for the Excerpt.
- When adding a Manual Excerpt, you must manually add the Read More link. To do so, include the following HTML at the end of the Excerpt box:
<a href=”https://example.com”>READ MORE</a>
replacing https://example.com with the URL of the page you want to link to.